Monday, January 31, 2011

Project 4: Environment Design


For Wednesday, February 2, do 20 thumbnails of environment ideas. See above. Keep it loose and flowing. Don't spend too much time on any one thumbnail. The point is to practice getting an idea down in a pure form without being distracted by detail.

For Wednesday, February 9, work up 3 of your thumbnails into finished concepts. Do visual research to strengthen your ideas. Take some photo walks. By all means, use references for particular details of your places, but also use references for lighting, color, and artistic approach. Contemporary concept artists work with a huge range of techniques in working up to their final images; don't be afraid to experiment with photo collage and digital painting approaches. Mix and match!

Post your 20 thumbnails as well. We'll crit all this on Wednesday, Feb 9.


Preproduction concepts from Fallout 3 by Craig Mullins. A masterly example of collage/painting hybrid approach.

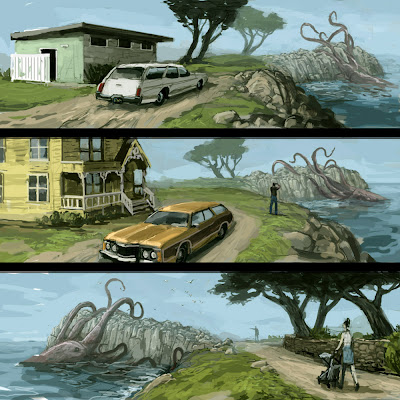
Alex Munn's work is more "painterly" but shows clear use of observed visual reference in the specific car models and architectural styles.

Make sure you work at a decent resolution (at least 2500 pixels wide or high)

REFLECTIVE ESSAY
Two parts:
1. Go to a location you've never been to before and write about the experience. How did you choose the spot? Why? Describe the sensations, what you noticed, how you felt being there. Describe the place physically, the quality of light, the color, sounds, sights, time of day, etc. What made this place a place?

2. Write about each of your three concepts. Describe the scene, the references you used, and the feel/effect you were going for.

Miles' straight drawing approach (using Flash) for The Melancholy 

Wednesday, January 19, 2011

Project 3: Character Finale


An excellent set of demo videos by Daarken for those interested in a painterly approach.

 Uh oh, Spaaace Zombies! Courtesy of the masterly Alex Munn

PROJECT 3: Character Finale
Pick at least two of your characters and create finished concepts for them. Here are the guidelines.

1. Create a finished full-color image of each of your characters. Consider the final format your character is to end up in. For a film, stage, or 3D game character, you'll be making a color image for another artist to model or construct. See Alex Munn, Daarken or other production artists for their approach to a final concept. If your characters are designed for 2D animation, or comics, create some "production stills" showing what these characters will look like in action. Focus on clarifying your approach to line and color. Regardless of your approach, emphasize clarity. These images are meant to answer questions, not raise them. If you don't know how to draw the gun/sword/purse your character needs to be carrying, now is the time to figure out how to draw that gun/sword/purse!!!

2. Create a set of character schematics for each character. Each schematic should show front and side views and should keep consistent scale. The height of the character in both views should be the same. Again clarity is key in these images. Be careful not to lose your silhouette and dynamic proportions in these images. Keep the drawings alive!

3. Make sure your images are a minimum of 3000 pixels along their longest dimensions. That will give you a decent 8 x 10 print. Feel free to work bigger, but after a certain point there's a trade-off between resolution and computer performance. Don't cause yourself unnecessary pain.

4. Write a brief character biography. Live it up. Be creative. Write in a style conducive to your project. An objective 3rd person approach is 100% fine, but you could also write in first person, in the style of your book or comic, stream of consciousness etc.

5. Organize your work into a clear set of presentation sheets. Include additional sketches or earlier concept work to supplement your primary images.

All components of the project are due before the beginning of class Monday, January 31. This is going to be a fair bit of work, so schedule your time and keep yourself on deadline. Do not neglect to complete any part of the project. No late work.

READING
So You Want To Be A Concept Artist by Keira Peney for Write the Game.com

REFLECTIVE ESSAY
Did the article help your approach or give you insight into the process? After the reading the article, do you actually want to be a concept artist? If so, what areas do you need to work on? I find that my conception of a character tends to change the more I draw it. Was this true for you? If so, how has your character evolved over the past few weeks? Did you have any rough patches while doing your finished work? Were there elements of your character you found that you had no idea how to draw from certain angles? How did you address these blind spots? I've found there is often a point where a character goes from having "a" sword to needing to have a very specific sword, and this need drives my visual research. Did you do additional visual research to clear up weak spots in your design? Did you end up simplifying or streamlining your character the more you drew it? Did you focus on visual clarity and readability of the character? Man, I hope so!

T'is in fact, clobbering time: Ben Grimm evolves!

GRADING

Monday, January 10, 2011

Project 2: Character Studies


Character studies by Jamie Noguchi from his sketch blog Angry Art Monkey


David Hockney's costume designs for Mozart's The Magic Flute (click for larger view)

Kiwi studies from Jennifer Harlow


PROJECT 2: Character Exploration
1. Pick five of your silhouette studies and revise them based on the feedback you got in critique. Post your before-and-after versions to the blog with a brief write-up on the revisions. Did the work improve? How? Was it easier to see your work with more "gestalt" after you had some time away from it?

2. Create 10 characters and do a minimum of 5 studies of each character for a grand total of 50 drawings. You may use any medium or combination of media you wish. If you are doing characters with a recognizable gender, do a mix of males and females. Don't draw the character in the exact same pose each time; try a variety of views/angles/actions.

3. For each character you create, find at least one visual reference (minimum 10 total). This can be for any aspect of a character - pose, hair-style, dress, hat, wings, paws, eyebrows, weapons, vague inspiration, mood, color, visual approach pointers - anything. Post your visual references on the blog.

All components of the project are due before the beginning of class Monday, January 17.


READING
Read Maurice Sendak's essay on Disney and Mickey Mouse. The essay, reprinted from Sendak's Caldecott & Co., Notes on Books & Pictures, is not available on line, so I'll hand it out in class.

Preview of next week's focus. Advanced Character Studies!
Steve Hammond - SOU Alum and texture artist for Rhythm & Hues. Check out his flatbook.
Alex Munn - Lead background artist for Diablo II - general super star.
Daarken - Photoshop character design painting demo by  - Character artist for Warhammer

REFLECTIVE ESSAY:
In two or three clear, precise paragraphs, write an essay inspired by Sendak's. Who is your Mickey Mouse? I'm assuming it's not Mickey Mouse, because we all grew up with the crappy, corporate version of Mickey instead of the cool, ghetto Mickey. I digress.

GRADING
I'll be using the following rubric to assess the project. 5 categories, maximum of 5 points per category. Click the image for a larger view or click here for the .docx file.
Herodotus studies by Miles

Sunday, January 2, 2011

Project 1: Silhouettes


image courtesy of Creative Juices

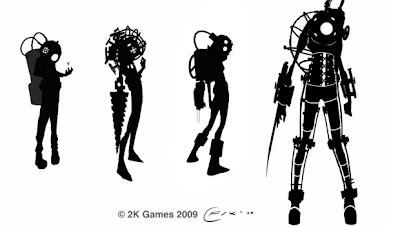
 Uh oh, it's a BIG SISTER!!! Concept art by Colin Fix for Bioshock 2

PROJECT 1: SILHOUETTE
Your first project has two parts:
 1. As the folks at Creative Juices did in the image above, draw 5 silhouette studies of characters you did not create. Yes, you may color over an image in Photoshop to make these studies.

2. Create a minimum of 30 original character silhouettes and post them to your blog. You may use any medium or combination of media you wish. You may put several silhouettes on one "page." See the two examples above.

Your silhouettes must be posted to your blog before the beginning of class Monday, January 10.

BLOG
You are required to keep a blog for this course and post all of your lab projects there. If you're new to bloggin', I recommend blogger.com as it's free and easy to use. If you find a service that works better for you, however, by all means, go for it. Yes, you may use a blog you have started before this class, just make sure you label your posts clearly so I don't get cranky. Once you have your blog set up, post your name and your blog's URL as a comment to this post. You must do this now, as in today, January 3. Check the comments section of this post for an example of how to do this.

PHOTO
Take a photo of your self and post it in the "about me" section of your blog by Monday, January 10.

READING
Each week, you'll have a reading or two and will write a reflective essay related to your project. You'll post your writing assignment to your blog along with your studio work. Your written reflection is 25% of your project grade and must be posted before class on Monday, January 10.
Here are your readings for the first week:
Reflective Essay Writing Tips For College Students
Cartoon Silhouettes

Additional resources you may wish to consult:
Art of Bioshock .pdf
conceptart.org
Jen Harlow Silhouettes
Destructoid links to more Bioshock 2 concepts

REFLECTIVE ESSAY:
Reflect on the process of creating your silhouettes. In two or three clear, precise paragraphs, try to answer at least three of the following questions: How much did you know (or think you knew) about working with silhouettes before today? Did you start with a plan and stick to it, or were there some unexpected discoveries along the way? What approaches did you take to creating your silhouettes and why? Which do you think is your best final image? How did you decide a silhouette was 'finished'? Did you return to your work to edit it? Did the essay on silhouettes and the accompanying visual help clarify your approach? Did you work with a character you had designed before? If so, what did the silhouette process reveal? Did your design change as a result? Might silhouette work become a part of your creative process?

GRADING
I'll be using the following rubric to assess the project. 5 categories, maximum of 5 points per category. Click the image for a larger view or click here for the .docx file.